
398th Bomb Group Combat Formations
By Wally Blackwell, Pilot 601st Squadron
December 2003
The use of the word formation by the 8th AF organizations of WWII referred to an orderly assembly of airplanes, lead by one of the airplanes, arranged together for their mutual protection, that could bomb a target in a coordinated and efficient manner. The group bombing formation used by the 398th Bomb Group when it arrived at Station 131 in April of 1944 was called a Combat Box Formation. That particular formation was developed by General Curtis LeMay, learned from his experiences as an 8th AF strategic bomb group commander. The 8th AF Bomb Groups had used various formation schemes with some degree of success beginning in 1942, but the Box Formation had eventually become a standard for all 8th AF group formations. The Box Formation was accepted at that time as the best arrangement of airplanes for maximum firepower, from all guns of all planes, while providing a bombing pattern with maximum effect.
The Combat Box Formation was made up of a number of basic airplane relationships. From the smallest to the largest, these formations were:
- Element Formation: three planes
- Squadron Formation: four Elements - twelve planes
- Group Formation: three Squadrons – thirty-six planes
- Wing Formation: three Groups – one hundred and eight planes
Element Formation
An Element of three planes was the basic unit in all formations. The Element lead was responsible for maintaining his Element's position relative to the Squadron lead at all times. One plane flew off his left wing and one off his right wing. Those flying the left and right wing positions were responsible for staying in "tight formation" with the Element lead at all times, but on the bombing run to the target in particular. The Element wing positions tried to maintain their positions about the same altitude, one wing length horizontally from and one wing length behind the Element lead. See Diagram 1 for the Basic Element Formation.

Diagram 1: Basic Element Formation
This Basic Element Formation was really the most tedious and perhaps dangerous formation position to fly, be the Element in the Squadron or Group formation, because of the close operating distances and the reliance of the "other guy" to do his job reasonably well. Usually the pilot/co-pilot took turns, perhaps fifteen minutes or so at a time, maintaining their plane's position in reference to the Element lead. In a tight formation the vertical and horizontal distances between the Element leads might be only a few hundred feet.
Squadron Formation
There also were a number of Squadron formations tried and used with varying of success during the 8th AF's time in combat. The 398th Squadron Box Formation was made up of four Elements formations, each like the one described above. The four Elements of the Squadron formation were arranged as follows:
- The Lead Element became the Squadron lead with the other three Elements flying positions all oriented on his lead position.
- The High Element flew above, to the right and behind the Squadron Lead.
- The Low Element flew below, to the left and behind the lead the Squadron Lead.
- The Low Low element flew directly below and behind the Squadron Lead.
See Diagram 2 for the Squadron Box Formation.
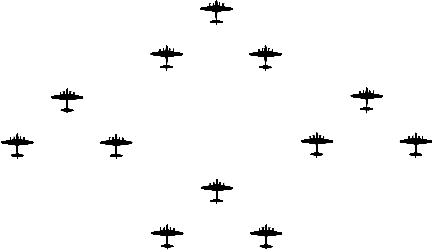
Diagram 2: Squadron Box Formation
An excellent photo example of a box formation can be seen in 398th Bomb Run Over Bingen - 29 December 1944 in what appears to be a flock of geese in the lower left part of the photograph. If you study the photograph carefully you will see 4 sets of 3 elements arranged in altitude with respect to the lead element as described above.
Group Formation
A three-Squadron Formation formed the Group Formation, such as the 398th Bomb Group. The basic Squadron Formation described above became one of the three-Squadron formations that comprised the Group Formation. The Group Formation was identified with that group’s insignia, such as the Triangle W of the 398th.
- The Lead Squadron formation of twelve planes was in front.
- The High Squadron formation flew above, behind and to the right of the lead.
- The Low Squadron formation flew below, behind and to the left of the lead.
See Diagram 3 for the Group Formation.
S |
||
S |
S |
Diagram 3: Group Formation, where S = a Squadron Formation
An example of the Group and the Squadron Box Formation chart can be seen on the 398th's August 8, 1944 Mission to Cauvicourt Formation Chart. The 603rd was the Lead Squadron that day. For the 603rd Squadron, Hopkins is the Lead Element Lead, Engel is the High Element Lead, Fisher is the Low Element Lead and Rudrud is the Low Low Element Lead. Captain Wagner in the lead plane with Hopkins was not only the Squadron Commanding Officer that day, but the Group Commanding Officer that day as well as he lead three 398th Squadrons, the 603rd [Lead Squadron], the 601st [Low Squadron], and 600th [High Squadron].
On some historic 398th records, the positions flown by the pilots in the formation are indicated in text. An example found from an August 16, 1944 Interrogation Form for Jordan is "ld hi low gp". Spelled out this would be "Lead High, Low Group" or in other words, Jordan was the "Lead of the High Element in the Low Group. The Generic Box Formation Chart may be of help to researchers in translating these abbreviated text names into physical positions in the formation. It should be noted though that there is no standardization in the records of the abbreviated formation position names.
Wing Formation
The positioning relationship of the groups that comprised the wing continued the lead, high and low formation concept. That is the terms lead, high and low also referred to the positioning of the individual group formations in relation to each other in the wing formation. Again there was a Group Lead, Group High, and Group Low arrangement in the Wing Formation.
- The Lead Bomb Group formation of thirty-six planes was the front of the Wing.
- The High Bomb Group formation flew above, behind and to the right of the lead.
- The Low Bomb Group formation flew below, behind and to the left of the lead.
See Diagram 4 for the Wing Formation.
G |
||
G |
G |
Diagram 4: Wing Formation, where G = a Group Formation
The First Combat Wing of the First Division of the 8th USAAF was composed of the three Bomb Groups - the 91st, the 381st, and 398th. The tail insignias were as follows: the 91st was the Triangle A, the 381st was the Triangle L, and the 398th was the Triangle W.
Distances between the Squadron Formations were measured in hundreds of feet. Distances between the group formations measured in thousands of feet. However, it must be said that the prescribed and actual flying distances between all the formations at any time varied due to weather, combat conditions and flying skills.
Modifications to the Box Formation
Beginning in late February 1945, the well-established and standard Box Formation used by the 398th was modified. Instead of four three-plane elements comprising a Squadron Formation as described above, that Squadron Formation was changed to three elements of four planes each. The three planes that previously formed the low, low element in the old Squadron Formation were used to fill the three slot positions of the lead, high and low elements of the new Squadron Formation. The slot position was directly behind, but lower than the Element lead. Please refer to diagram 5 for further explanation. All three Squadrons of the Group formation flew in this new revised formation. There were no changes in the relationship of the squadrons in the group formation. Thus, a Squadron still flew 12 planes, but in three elements of four planes. There is no definitive history as to why the change, but it probably involved a decision about providing a better bomb impact pattern. See Diagram 5 for the Modified Box Formation beginning in later February 1945.
X |
||||||||
X |
X |
|||||||
X |
X |
X |
||||||
X |
X |
X |
X |
|||||
X |
X |
Diagram 5: Modified Squadron Box Formation, where X = an Aircraft
Abandoning the Box Formation
Then in April 1945, just before the end of the war, there was a major change in the previously used Squadron and Element formations. At that time the Squadron Formation became variations of two Vee's of planes, one Vee Lead and the second Vee behind and just below the first Vee. The center plane in the leading Vee was the Squadron Leader with a two-plane echelon on both his right and left wings. The second Vee, consisting of as many as five planes, was lead by the center airplane of that Vee. The second Vee leader positioned himself directly behind but lower than the Squadron Leader. See Diagram 6 for the Vee Squadron Formation beginning in April 1945.
X |
||||
X |
X |
|||
X |
X |
|||
X |
||||
X |
X |
|||
X |
X |
|||
X |
Diagram 6: Vee Squadron Formation, where X = an Aircraft
However, a careful review of the actual formations flown on specific missions during that time show that various day-to-day modifications of this basic two-Vee formation concept were made. There were instances found where the second Vee consisted of only three or four planes.
This new Vee formation configuration completely replaced the previous three-Squadron rotation of 36 planes for the group formation. Occasionally, an eleventh plane would fill the slot behind and below the second vee. At that time all four squadrons often flew on all missions, thus there were as many as 44 planes, rather than 36 planes, available for maximum effort missions.
It is interesting that some veterans that flew 398th combat missions during the last few months of the war, remember another innovation that occurred. For the first time in 398th group history, various Squadron crews were assigned across all portions of the group’s formations.
That is, the Squadron Formations were not made up solely of one Squadron’s personnel. Each Squadron Formation became a mixture of crews from different Squadrons. This intermixing of Squadron personnel may also have been an attempt to accomplish a better overall performance in bombing accuracy. Although there always was a friendly rivalry between the Squadrons (even to this day) this intermixing of personnel may also have been an attempt to establish more of a Group identity.
Early Combat Box Formations
Earlier in the air war, different formations were tried. The following information was submitted by Col. Harold Weekley, 601st pilot, who recalled there was a 54 aircraft combat box.
From the THE BOMBER WAR, by Robin Neillands, THE ALLIED AIR OFFENSIVE AGAINST NAZI GERMANY, on Page 166, a 381st. Bomb Group B-17 Navigator makes the following comment:
"On a mission, though the number varied later, in 1942 a squadron put up six aircraft and a group put up three of its four squadrons, resting one. Therefore, at three groups to a wing, a 'combat wing' had 54 aircraft, while a 'division' would consist of two or more wings." In a previous paragraph, it was stated "their squadron led the 'combat wing' of 54 bombers".
Col. Harold Weekley recalls that this early 54 bomber "combat wing" was called a Combat Box.
Formation Leaders
The Group Lead Formation was responsible for the success of the mission of that organization. The lead pilots, navigator and bombardier were responsible for the leadership of their formation whether Squadron, Group or Wing. The role of leadership rotated between the Groups assigned to the Wing, as did the leadership of the Group rotate between the Squadrons as the organizations flew missions. The Group had experienced "lead" pilots, navigators, bombardiers and the Squadrons had experienced "lead" pilots, navigators and bombardiers.
Formation leadership usually came about from a graduation process of experience and the opportunity to fill positions vacated by those who were shot down, completed tours, etc. of course, becoming a lead enhanced the possibility of promotion. If a pilot was selected to be a lead, he flew fewer missions, due the vulnerability of the lead position in the formation, and his crew had to fly only the number of missions he did. The responsibility and importance of the lead position related to the rank of the officer in charge of the mission. For instance, the Group-Commanding Officer usually only flew when his Group led the Wing. A Squadron-Commanding Officer usually only flew when his Squadron led the Group.
There also was a deputy lead role for each Group and Squadron formation. The deputy lead always flew on the right wing of the lead and was prepared to assume the lead role responsibility in an emergency.
There was a path for a newly assigned pilot and crew that began flying the wing positions in an element, then to element lead to squadron responsibilities. Such a path was often affected or disrupted by the many fortunes or misfortunes of him and/or others.
Composite Group/Squadron Formations
Composite Formations occasionally happened when, probably out of necessity, a formation was made up of a mixture of crews and planes from more than one organization. Examples of this included filling out the necessary number of crews to complete a Squadron/Group formation from another Squadron/Group due to combat losses of planes and personnel availability from preceding days. This also happened, when in a maximum effort mission, a fourth Squadron would be a composite of crews from different Squadrons.